|
This may not be a revelation to a lot of people, but for others, this may be the revelation they are looking for. In all the books and websites that I have read, I have not come across a diagram like the diagram that I am going to call the photography butterfly. So let's start with breaking the photography butterfly down to its two main elements:
Exposure Triangle I am guessing most have seen this before. For those that haven't let me explain it. There are three elements to a correct exposure of an image. They are:
So how does this triangle work? Imagine the green equilateral triangle is your image which is correctly exposed. We want to keep the triangle always equilateral as that is the correct exposure. But imagine if subject is moving too fast to freeze the action with your current settings. So to freeze the action, you would change the shutter speed to a quicker shutter speed. Doing this would change the shape of the triangle, no longer making it equilateral. So increasing the shutter speed would mean that less light would make it to the sensor. So to allow more light to reach the sensor, you would have to adjust one or both of the other settings. In this case let's just adjust one (the aperture) for simplicity. To maintain balance we now need more light. So if we were to open the aperture by the same amount of stops as we changed the shutter speed, we once again create an equilateral triangle. Conversely this would work the same if we had of adjusted the ISO to make it more sensitive to light by the same amount of stops as we had adjusted the shutter speed. So using this theory, we can apply that to any of the apexes of the triangle, noting the one or two of the other apexes will need to be adjust to keep the triangle equilateral or correctly exposed. 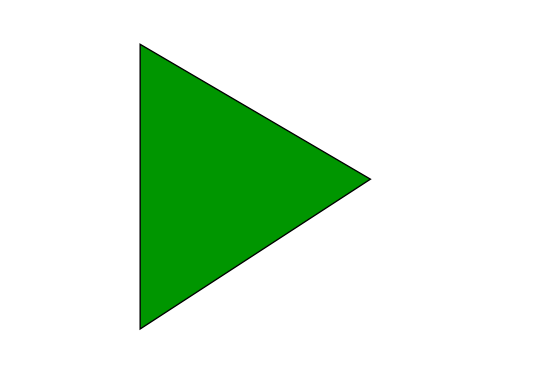 Exposure Triangle Depth of Field Triangle Now let's look at the Depth of Field (DoF) Triangle. Once again there are three elements that govern the DoF with in an image and they are:
So how does this triangle work? This works using the exact same theory as the Exposure Triangle. In this case we want to keep the DoF (the red triangle) looking the same in relation to the background and foreground. This is called the area of acceptable focus. The area of acceptable focus is defined as 1/3 in front of and 2/3 behind the subject which our eye considers that is in focus. So if we use Distance from Subject as our setting which we are changing, we can extrapolate the following. If we were to move closer to a subject, the subject would fill more of the screen up until they start to completely fill the frame. But before we go so far, we noticed that the area of acceptable focus becomes smaller and eventually that the DoF is so shallow, that most of the subject except for a very thin plane is in focus. This can be good for isolating the subject from the background, which makes it look like it is separated from the scene (great for portraiture). But in this case we want to keep all of the subject in focus. This can be achieved by adjusting either or both the lens viewing angle or Aperture. In this cae we change the lens viewing angle to a wider lens. For example swap a 50mm lens for a 35mm lens, which will increase the DoF (area of acceptable focus). Once again, whatever setting you adjust you will need to adjust one or both of the other sides to keep the same DoF.  Depth of Field Triangle Photography Butterfly How they interact As you may have already noticed, there is one common link between both triangles and that is Aperture. Knowing that the aperture will effect the Exposure triangle and the DoF triangle, ties the whole process of photography together. So how does this triangle work? If you were to adjust the aperture to compensate for the lack or excess of light in your exposure triangle, it will effect the area of acceptable focus in the depth of field triangle. Knowing this you may adjust other settings to maintain correct exposure and Dof.  Photography Butterfly If any of this does not make sense or could be improved, please leave a comment with suggestions to improve this tutorial.
0 Comments
Leave a Reply. |
AuthorMy name is Mark McIntosh, but everyone calls me Macr. Archives
March 2019
Categories |
 RSS Feed
Proudly powered by Weebly